After a pretty long Facebook Ads tutorial Part 1 about setting up your Business Account, creating Page Likes & Post Engagement ads, we will focus now on Website Traffic & Conversion ads.
Certainly, the most important type of ad is if you are expecting people to visit your business website and/or to do specific actions such as filling out a contact form, purchasing a product, or subscribing to your newsletter.
The website Clicks ads are easy to set up, conversions require an additional setup: installing the Facebook Pixel code to your website.
We will see the latter further on but for now, let's start with Website Traffic.
Facebook Ads Tutorial: Traffic Campaigns Setup
As I am expecting you to have followed up on the steps to create your Facebook Business Account, go to your Campaigns Dashboard and click on the green button + Create.
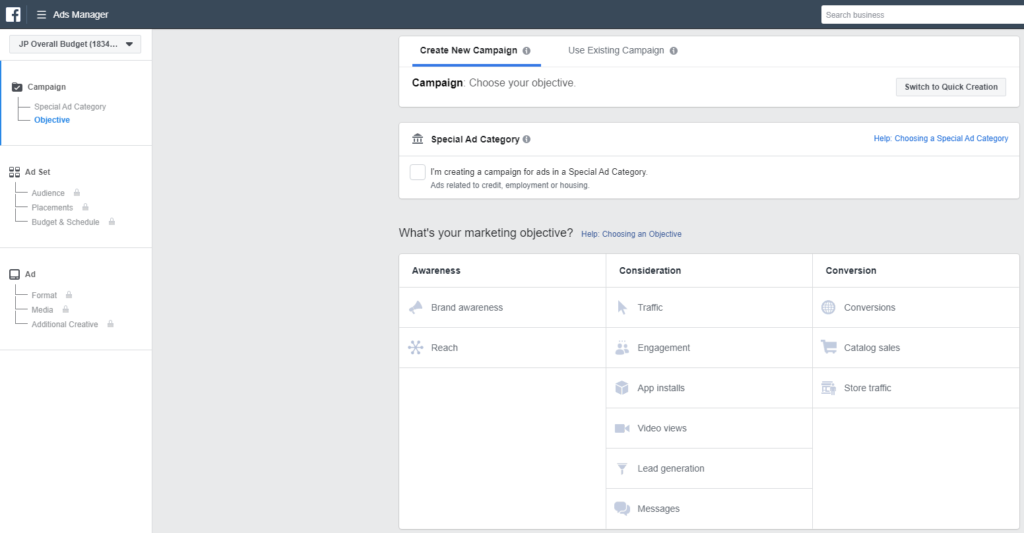
This window will pop up.
Optional: as we saw previously if your ad campaign will be about Credit, Employment, or Housing, you need to check out the box in Special Ad Category.
Within the Consideration column, select Traffic and then you'll be invited to set your campaign ad budget:

We already explained the concept behind A/B Test and the campaign budget optimization in Part 1 so we will move on to the next step.
Ad Sets For Traffic Objective

A difference here compared to other ad sets, you will need to select one destination:
- Website: the most common one, is the one you will use to bring people to your website.
- App: send people to your App's page. Any app that you registered on Facebook's developer site.
- Messenger: send people directly to a discussion with your company through Facebook Messenger.
- WhatsApp: same as Messenger but with WhatsApp.
Select the most convenient one for your objective and let's move on.

No changes here, set your preferred audience and placements then proceed.

Some changes here, you will have to choose what Facebook should be focusing on (Optimization for Ad delivery) and based on what metric you will be charged for (When You Get Charged).
- Optimization for Ad Delivery
- Link Clicks: Facebook Ads will focus on bringing the highest number of clicks on your ads.
- Landing Page Views: Focus on people who will click on your ads and will at least see your landing page. Meaning that sometimes people click on your link but don't wait until your page is loading... Yes, it happens quite often so this optimization ensures that you get people who actually saw your landing page.
- Daily Unique Reach: your ads will be shown to a maximum number of people but up to once a day.
- Impressions: show your ads a maximum number of times, regardless of past interactions or what the viewers could potentially do on your website.
- When You Get Charged
- Impression: you get charged on a per 1000 impression basis
- Link Click (CPC): you pay only if someone clicks on your ad.
2 things:
First, the options you get on how to be charged vary from one optimization to another, the default charge is on a per-impression basis.
Second, it is hard to suggest you one thing over another. Usually, we at Krows Digital, tend to focus on Landing Page Views (with a charge on impressions) as it ensures that people are visiting the website.
Nonetheless, other times we found better results with Link Clicks optimization... Up to you to test them or to us to do it for you...
Self-promotion over, let's continue!
Click on Continue.
Destination Set Up on Ads

Simple addition to the ad section, you need to add a Website URL. This is where your ad will bring people to.
You can also add URL parameters by clicking Build a URL Parameter. This is useful to track on your analytic software (e.g. Google Analytics) where people came from.
That is totally optional.
Another optional option is the Display Link. If your link is too long, ugly or you want to transform it for any other reason just write a more appealing one.
The only condition here is that your "fake" link should still go to the same domain as the real link.
Finally, the Call to Action (CTA) is the button message people should click to go to your landing page.

You will have a lot of choices but the most popular ones are certainly "Learn More" & "Shop Now" but don't forget the "No Button" option.
The latter will take out the button but people will still be able to click on the image to go to your landing page.
You would want to take out the button if your headline is cut by the button.

If you want to add additional languages, just select one or more here and let Facebook translate your ads (Not Recommended) or do your own translations.
This is worth it if you selected multiple countries with different languages and if the language has no conflict with your landing page.
Tracking

Finally, activate your Facebook Pixel to track what people from Facebook do on your website (Pixel Set Upcoming just after!).
For the rest, nothing we didn't explain in Part 1.
Confirm your ad (or review if you don't see the confirm option) and you are good to go!
Facebook Pixel: Let's Set It Up!
As we said earlier in this Facebook Ads tutorial, if you want to track anything your audience is doing on your website like viewing a specific page, purchasing a product or subscribing to your newsletter, for example, you will need a Facebook Pixel installed in your website.
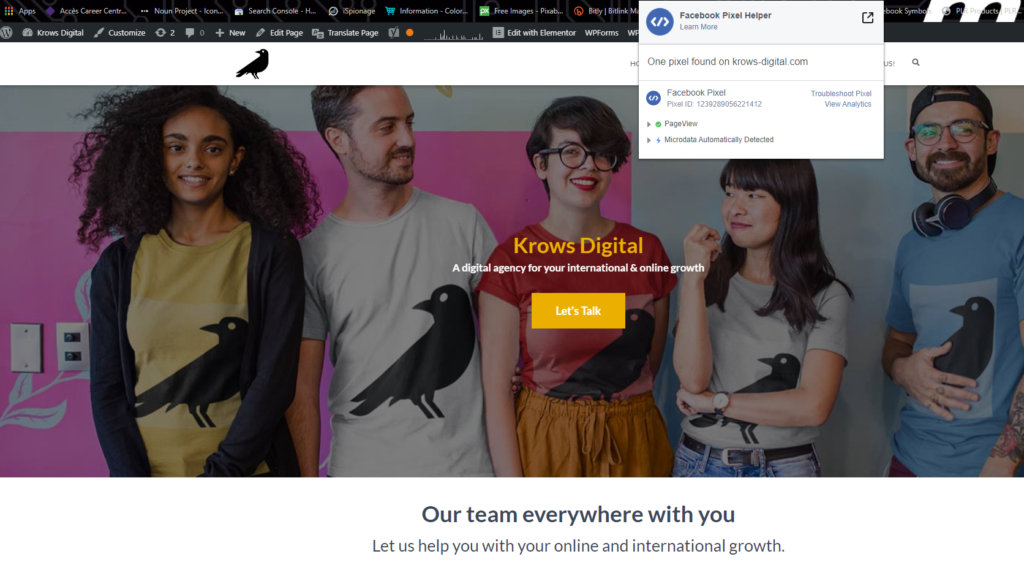
As you can see with the free Google Chrome Extension Facebook Pixel Helper, our website tracks what people do on our website.

So, to get your own Facebook Pixel, go to your Facebook Business Account Overview and click on Ads Manager on the top left corner of the page.
You will see this listing. From there, click on Events Manager under Manage Business.
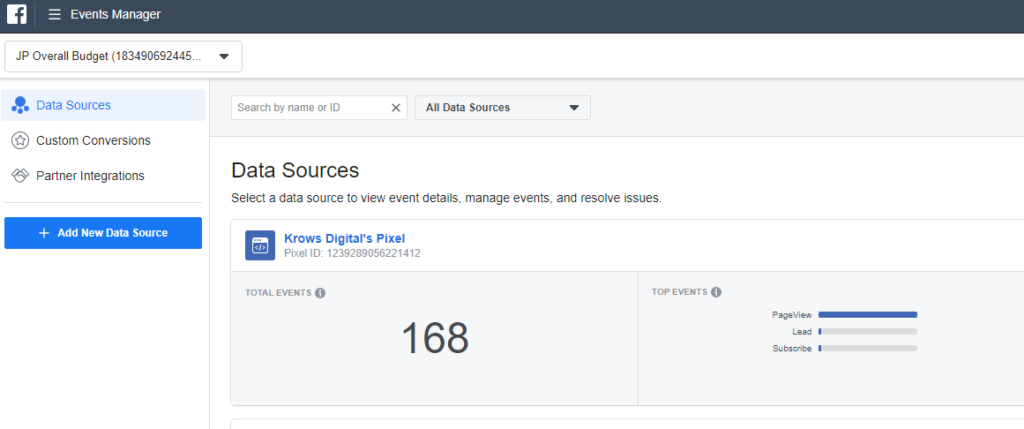
You'll be presented to this page with your active Facebook Pixels. Of course, if you are here, chances are that you don't!
Then, let's click on the blue button + Add New Data Source to create a new Facebook Pixel.

Decide on a convenient name for your Facebook Pixel and add your domain address to check it later on.
Done? Press Continue.

You will have 3 ways to install your Facebook Pixel:
- Email Instruction to a developer: give the job to someone else!
- Manually add pixel code to the website: the classic way of doing it. You'll get a code that you need to add to the header of each of your pages.
- Add code using a Partner integration (Recommended): great chances are that your website is running through a CMS (Content Management System) like Shopify, WordPress, Wix, etc. If that's the case you will not need to add your code yourself. Simply choose this option then select your current CMS and finally follow the required steps and you will be good to go!

Set Up Events
Quick reminder, an event is an action a visitor did on your website. From a page view to a subscription, almost everything can be considered an event.
Back to our Pixel setup, depending on your choice of CMS, most of the required events that you need to track should be set up properly.
This means that now you can see what people do on your website after seeing specific ad campaigns or you can even have campaigns only focus on converting to specific events!
That is great but there are 2 more things you need to know before moving on to Conversion Ads Campaigns.
First, there are 2 types of event triggers:
- On-Page Load: the event is activated by having someone go to a specific page. E.G. a Contact Us Page event will be triggered if people visit any page on my domain containing /contact-us.
- On Click: the event is activated by having someone click a specific button. E.G. a Contact Us Click Event will be triggered if people click on Send at the end of our contact form.
The Page Load one is easy to set up and can be done directly from your ad creation (see later on) while the Click trigger needs a specific action to be set (check right after this).
Second, there is a way to set up your Click Events easily.

Go back to your Events Manager page and on the left side, select Data Sources.

Select your Pixel. For us, we have to click on Krows Digital's Pixel.

On this page, multiple things you can do & check:
- Create Audience: define a specific audience who has visited (or not) certain pages of your website during a certain amount of time.
- Create Custom Conversion: set conversion events based on specific pages people have visited or not. (The same idea as the create audience section)
- Open Event Setup Tool: the most unique option, this one let you browse your own website and select buttons you want to consider as an event on Facebook.
Let's check them all.
Open Event Setup Tool
Click on the blue button Open Event Setup Tool from the last picture.

Type the domain (or a specific page on this domain) linked to your Pixel then click on Open Website.
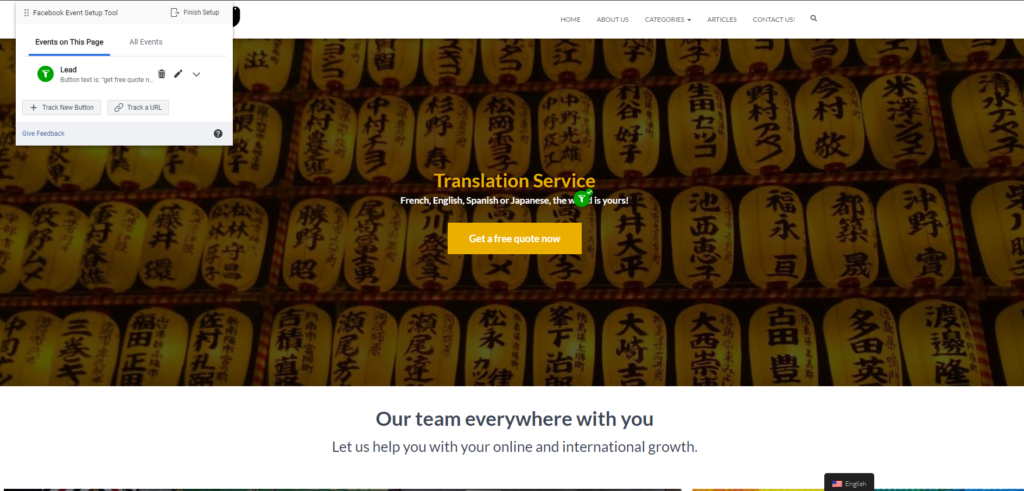
You will be able to visit your own page with this pop-up box on the left side. From there you can track a new button or track a Url.
For the URL, I suggest you use the custom conversion instead but it is up to you.
For the track a new button, no other choice! So let's select it and you should see something similar to this:
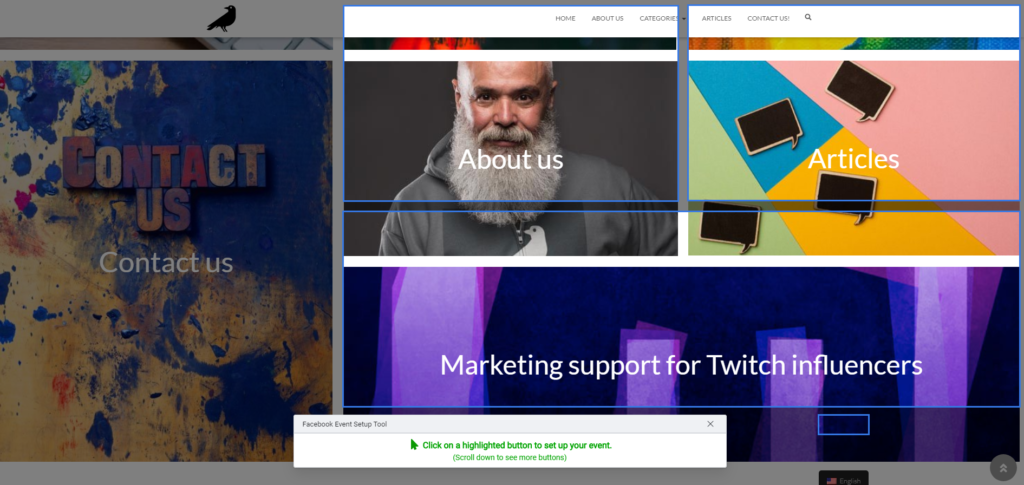
The Facebook Event Setup Tool will track all the clickable buttons on the page and will ask you to click on the one you want as a conversion.

When the button is selected, you will have to link it to a Facebook registered action such as "Lead", "Purchase" etc.
Choose the best one, confirm and you are good! You can leave or add a new button.
Create Custom Conversion
Back to your Events Manager Page, select your Pixel if you have multiple, and then click on Create Custom Conversion on the top right of the page.

You will be presented with this pop-up window where you can set up a new event based on a mix of conditions. Choices are up to you but let's what we have:
- Pixel: in case you have several (like us), you will see the option to switch to the related Pixel. In this example, we chose Krows Digital's Pixel.
- Website Event: choose to focus on people who visited your website (All URL Traffic) or on any event you already set up.
- Rule: Choose between URL (people who have visited specific pages of your website) or Referring Domains (to include or exclude people coming from specific websites). In both cases, you will need to select the condition.
- Contains: type a part (or entirely) of the URL you want people to have visited. For example, if my event focuses on the contact page visit, I would want this condition to contain /contact-us which is the page on our website leading to our contact form.
- Doesn't Contain: the opposite, exclude pages you don't want for this event.
- Equals: "Contains" focuses on any page with a part of the selected URL like /contact-us but this option will ask you to type the exact full URL you want (basically it should work for only one page).
- Is Empty: Only for Referring Domains, if you don't want visitors to come from any other website.
- Add Another Rule: as you might have guessed, you can create another rule so the event will only be considered if people have done both of the rules. Only one of them doesn't work.
The rest is more straightforward, choose a name for your event, a category to link it to like "Subscribe", "Payment" etc, and finally, a value (optional) for the event.
This last one let you set up a fixed monetary value for the event. For example, maybe you consider a subscription to be worth $50 so just type it down.
You're good? Click on Create and you can move on!
Create Audience
While we are here, let's talk about how to create a specific custom audience. This is helpful if you want to target your ads to only people who visited specific pages.
For example, your ads could focus on "Cart Abandoners" by choosing people who visited your product pages & cart page but didn't visit the checkout page.
You will also have the option to create a Lookalike Audience. You specify everything, in the same way as the custom audience, but this time your ad will not focus on the people who visited these pages but on people with similar profiles on Facebook. Useful to target a new audience based on your existing audience.

Click on the Custom Audience and you will have a pop-up window, pretty similar to the custom event one.
Reminder: the custom audience is being used mostly in retargeting ad campaigns. Ads that focus on people who did or didn't do something on your website.
Let's go step by step:
- Include people who meet: ANY ==> at least 1 criterion needs to be achieved to be part of this audience; ALL ==> all the criteria need to be fulfilled to be part of this audience.
- Pixel: Select the pixel you want to use. Here we are using our own Krows Digital's Pixel.

- You can choose to have your audience narrowed based on:
- All website visitors: target everyone who visited your website, no distinction.
- People who visited specific web pages: target only a portion of your overall traffic based on specific URLs (works the same as in Custom Conversion).
- Visitors by time spent: create an audience based on how long visitors stayed on your website or specific pages (by using AND condition).
- From your events: target people based on your existing events.
- Length: for all added criteria you can define since when people should be in your custom audience (last 7 - 30 days, up to 180 days)
- Include More People: add another criterion to include more people in your audience.
- Exclude People: define criteria the same way as previously but this time to exclude people from your custom audience.
- Further refine by:
- Frequency: set how many times events should have been triggered to be part of this audience. E.G. someone purchasing twice will trigger the event purchase twice so you can focus on this person by selecting the event Purchase and by adding Frequency 2.
- Device: Choose from which device people should be visiting you. Desktop, All Mobile Devices, iOS, Android.
- Name your audience: I am sure you know what it is about!
Create an Audience and we are over here!
Let's Start Conversions Ad Campaigns
Last part of today's article: how to create Conversions ad campaigns.
Believe, that is the easiest part of this long article!

As with every ad campaign on Facebook, go to your Facebook Business Ads Manager Overview and create a new campaign by clicking on the Create green button.
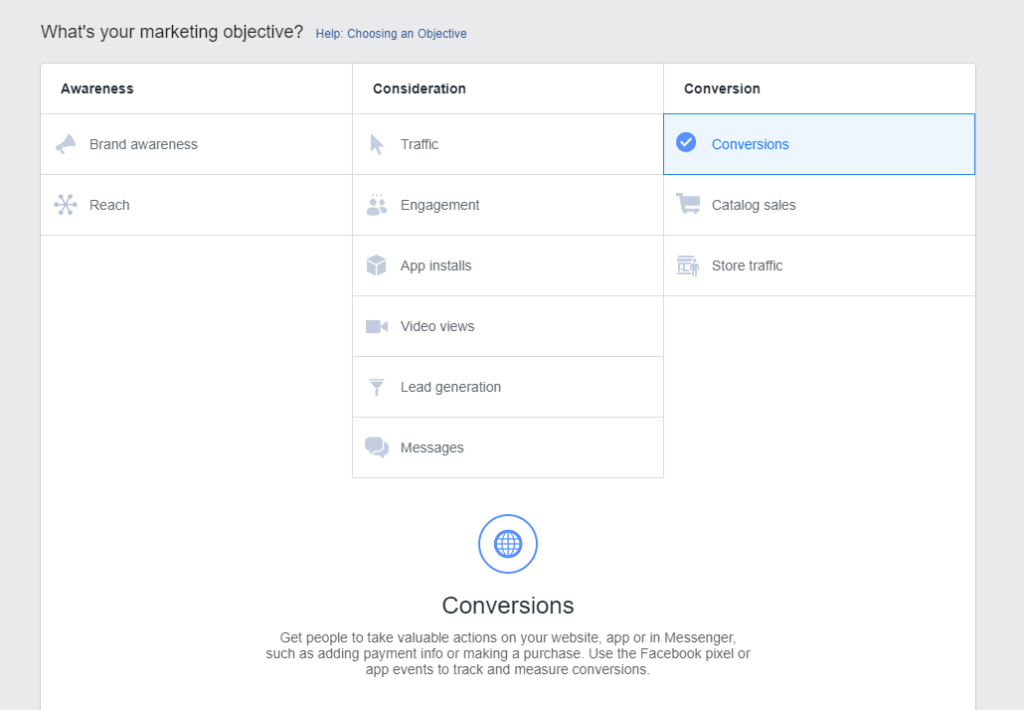
Select Conversions on the list and follow the same steps as before.
Ad Set Setup

The ad set setup is pretty similar to what you have done before except for the first part.
You'll be able to select your destination but here we are focusing on website conversions so keep website for the destination.
Following is the Optimization for Ad Delivery, a very important part here as you will have to choose to have your ad campaign optimized for:
- Conversions: Facebook will try to find the best audience (within your set audience) that have the best chances to triggering a conversion on your website.
Probably the best setting but you will have to pay on a per-impression basis so even if the campaign is not successful, you will have to pay for it. Goods and bads for sure. - Landing Page Views: The algorithm will find people who will certainly visit your website and, at least, look at your landing page. Same, you pay on a per-impression basis.
- Other Options: Link clicks, daily unique reach & impressions; use the default settings for ads.
Based on experience, there is no perfect answer to which setting is the best. Nonetheless, we found better results between Conversions & Link Clicks. Try both and see which one is the best for your business!

After you selected the desired setting, select the Pixel to use for this campaign. Obviously, you will need to use the Pixel installed on the website where you want people to go.
Here, we are using Krows Digital's Pixel.
Remember all these steps to create events and custom events? Now you can select them!
Choose the one that represents the objective of this ad campaign.
If you pay attention to the previous picture, we have green & red events.
- Green means that the event is active and has been triggered recently.
- Red is the opposite, your event has not been triggered by anyone recently.
- Orange: we don't have any here but it means that you didn't test your event yet.
Did you choose your event? Well, follow the rest of the ad set set up the same way as any other campaign and you are good to go!
Your ad will also be set up with your Pixel so just click on Review/Confirm and it is over.
Facebook Ads Tutorial Part 2 Conclusion
This step-by-step Facebook Ads tutorial might look complicated but we tried our best to help you start your Facebook campaigns.
Soon, we will do another tutorial to check your campaign performances and how to optimize them!
And, of course, if it is too complicated or you don't have time to manage your ad campaigns, Krows Digital will be more than happy to help you increase your online presence!
You can contact us here or you can subscribe to our newsletter to not miss any other marketing article.
Good marketing!
KD Team
CONTACT US NOW!
Let's see how we can help your business

