Facebook Ads is all about being visual and creative!
After rocking on Google Ads, it is time to talk about the other advertising giant: Facebook Ads!
If you have no clue what is the difference between these two advertising channels or don't know which one is the best for you, read this article:
Online Advertising: Facebook or Google Ads?
Facebook Ads allows you to focus on many objectives you may have for your business. Some of you will need to increase the visibility of their products, others will need to create engagement (social interactions like sharing or commenting) around your content, get more Page Likes, people to visit your website or better: conversions, people to purchase or contact you for example.

The full list of available objectives for Facebook Ads are:
- Brand awareness: Increase awareness for your brand by reaching people who are more likely to be interested in it. We believe it to be quite powerful for famous brands needing to promote a new product (example: CHANEL promoting a new perfume) or for a brand that doesn't need specific actions on their website or on their social media account (example: Bloomberg targeting people with interest for Finance)
- Reach: Show your ad to the maximum number of people. Same concept as brand awareness but it focuses more on quantity than quality.
- Traffic: Send more people to a destination such as a website, app or Messenger conversation. Let's call it the basic objective, to send someone somewhere. You pay per click on your ad or per 1000 impressions (1000 times your ad was showing on a screen regardless of any interaction). Probably the closest objective to Google Search Ads.
- Engagement: Get more post engagements, Page likes, event responses or offer claims. This one is here to boost the visibility of your social media accounts through page likes, comments, shares...
- App installs: Get more people to install your app. I am sure you understand the meaning of it.
- Video views: Get more people to view your video content. Upload your videos and show them to people that will certainly watch them for a certain length.
- Lead generation: Drive more sales leads, such as email addresses, from people interested in your brand or business. The best if you need people to fill a contact form. This one can be linked to different marketing automation tools like Mailchimp (with Zappier...), SendinBlue, Klaviyo...
- Messages: Get more people to send messages to your business in Messenger, WhatsApp or Instagram Direct. Need people to start chatting with you? This objective is for you.
- Conversions: Drive valuable actions on your website, app or in Messenger. Probably the most important one for many businesses. You need first to install a Facebook Pixel code on your website to start tracking important actions that you want your visitors to do. These actions are called events (example: filling a contact form, subscribe, add to cart, purchase...) and you can ask Facebook to find people that have the highest probability to do the event you want. This event will be an important section of the part 2 of this article.
- Catalog sales: Create ads that automatically show items from your catalog based on your target audience. Let shows the products from your website directly on Facebook and let people see the price, description and provides a link to purchase on your website. We found this one useful in re-targeting strategies (people visit your website, your products but don't purchase, so you can show these exact products on their Facebook feed for a 2nd consideration).
- Store Traffic: Drive visits to your physical stores by showing ads to people who are nearby. This one focuses more on nearby people to come visit your store or office.
You see? A lot of marketing objectives for you to choose!
But we will only focus on the most important ones. Relax though, if you understand how these ones work, the other ones will follow the same principles.
So, in this part 1 of Facebook Ads, we will focus on the most basic type of objective: Engagement!
Let's see the different ways to do engagement ads.
Facebook Ads: Boosting Post
If you never did Facebook Ads before, the easiest type of ads is Boosting Post. This one doesn't require you to have a Facebook for Business account but just a Facebook page and a post to promote.
The concept is to increase the visibility of your post to a target audience that you will define.
You can also use one of your post to do basic website promotion or to advise people to install an app for example.
At Krows Digital we don't like much the Boosting Post system because it is similar to another one but with less options (you will understand further on).
Nonetheless, you can start an ad right away so for some people it might be good.

As an admin, go to the page where you published the post that you want to boost.
On each post you will see the blue button "Boost Post" to... boost...the post. You are following, great.
Click on it.

A pop up window should appear like this one.
When everything is filled on this window, your boost post will be good to go.
So let's go step by step.
Objective
Choose the objective to associate with your post. It can be more engagement or to direct people to an external link for example.
Here are the possible objectives:
- Send people to your website: Add an URL link to your website or any other place you want your visitors to go.
- Reach people likely to buy from you, and track sales: Focus on sales. Send people to your ecommerce website for them to purchase your products.
This objective requires your website to have a Facebook Pixel installed to track add to cart, product views, purchases etc - Get more people to react, comment and share: This objective will show your post to the people that will certainly like, comment and share it. Best one to create a community around your page.
- Connect and chat with potential customers: Give visitors the opportunity to start chatting with you in Messenger. It can be useful if you need new visitors to start engaging with you through messages.
Post Button (Optional)

You can add an optional button (Learn More in the example) that will send to the same link you copied on your post. So while you are creating your post, think well about the link you are adding as you can not modify it during the boost post process.
Special Ad Category
Click the button if your ad focus on housing, employment or credit. If not, don't click it.
(Just know that if you have to click on this option, age range and gender will not be available as option in the next step)
Audience
The most important aspect of your ad creation.
Here you can choose to show your ad to people who liked your page, to this same people and their friends, to people around your business (good for a restaurant for example) , custom audience created around your website and, of course, people you choose through targeting. We will focus on the last one as the others are set.
Choose the targeting option and click on edit.

First you will choose the gender of your target audience (except if you had to select special ad category before), then the age range of your audience (again, if you selected the special ad category, this choice is impossible).
Location: Choose the cities or countries you want to focus on for your Facebook ad. Add as much locations as needed.

Detailed Targeting: type everything that crosses your mind if you think about what kind of people your audience is interested in. For example, you sell Rolex watches? Type Rolex and automatic watches to show your ad to people who are looking for these.
Add as much as you need and remember to use the option "Suggestions" to let Facebook suggest you other interests based on what you already added.
No idea where to start? Use "Browse" to get specific suggestions (demographics, jobs, marital situation etc) to narrow your audience.
Talking about narrowing, you can see the option "narrow further" to... narrow... further. Here you can add more interests, demographics etc if you need your audience to be interested in different things at the same time. (I'll explain further on).
Finally the "exclude" option will take out anyone you don't want in your audience.
Example: In the screenshot you can see a first box with "Marketing" & "Digital Marketing", then you can read and must also match that leads to another box with "Small Business Owners" in it, then finally exclude people who match has "Marketing Officer" in it.
All of these can be translated as: " I want my audience to be interested in "Marketing" AND/OR "Digital Marketing" but this audience MUST ALSO be "Small Business Owners" yet, my audience SHOULD NOT INCLUDE people working as "Marketing Officer".
As you can see at the bottom, this audience we made is up to 84,000 people.
Depending on the type of business you are working on this might be a lot or nothing. If you have no idea how big your audience should be, start with a range between 100,000 and 1 million people. Adjust based on a logical thought about your market. Business owners interested in marketing is not as big an audience as sneaker lovers...
Once you are done, click the blue button Save.
When you are done, click Boost Post and if everything is fine, your ad is good to go!
If you don't want to bother too much with your ads (or you can contact us to help you!) you can stay there or you can create ads in the major league:
Facebook Business!
Facebook Ads: Let's create a business account
Why you might need a Facebook Business account
Simple, you will need a Facebook Business account if you are planning to develop a marketing campaign that sticks for more than one day.
Boosting post is fine if you're not planning to do it frequently.
If you are planning to increase traffic, get serious engagement, online conversions (sales, subscriptions, messages etc) or re-targeting (show your ads to people who previously visited your website or interacted with your business) you need to create a business account.
Let's get down to business, shall we?
Create a Facebook Business account
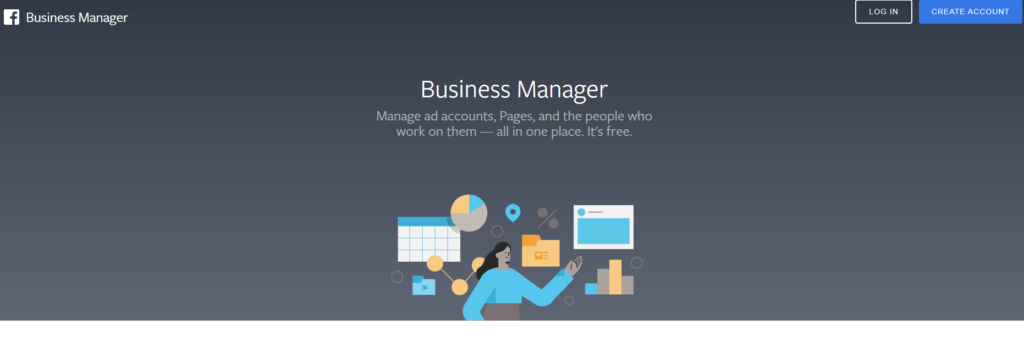
First, go to the Facebook Business page and log in with your current personal Facebook account. You can also create a new Facebook account but the social network is more and more picky with new & multiple accounts...
Follow the steps including giving a name to your account (private, so call it the way you want), create an ad account and add your banking information to connect to your future ad campaigns.
When it is done you will have access to your Business overview page:

By clicking on Ads Manager you will have access to all these options:

I would say that the most important links here are:
- Ads Manager: that is where you will see all your ad campaigns, account overview (budget, costs, results) and of course, your ads.
- Business Settings: manage your Facebook Pages, the people working for you (including their authority level...), the ad account (your payment method) etc
we will talk about this part, no worries. - Events Manager: here you will be able to create a Facebook Pixel for your website. This will allow Facebook to know what people do when they visit your website: view product, subscribe, contact... Facebook calls them events. Another part of this tutorial will be focused on re-targeting & Facebook Pixels.
- Audiences: You will see all the audiences surrounding your pages and website. You can also create custom audiences like "who liked your page the last 30 days", "who visited your homepage but didn't go further" or "who bought a product in the last 180 days" for example.
- Catalog Manager: if you sell products on your website you might want to have a catalog integrated in Facebook. That is where to do that and we will have an article on how to sell products on Facebook.
- No idea what is the best audience for you? Test different demographics, countries, languages, likes etc and discover related information and reached opportunities you might be missing. This will be part of the define audience section.
Regarding what you want to do we will need to jump on the Business Settings to fix basic things.
So click on the Business Settings link.

You will have access to all these options but right now only some of them are important:
- People: add people to your team by adding their Facebook emails.
- Pages: add your pages here so you can manage them right want from the business account page.
- Ad Accounts: you will need to create an ad account to pay for your ads. Just click on the add button and follow the steps. When it is ready, click on add people to decide who can manage the budget of your ad account (you can select the level of authority they can have).
- Instagram Accounts: as you can guess, add your Instagram pages to link them to your future ads.
Set up these segments and you are good to go!
Start creating ad campaigns
That was long but we can now set ad campaigns!
Click on Business Settings and then on Ads Manager.
You will see a page with different tabs such as Account Overview > Campaigns > Ad Sets > Ads.
The account overview will let you know overall data regarding the performance of your campaigns.
The campaigns regroup all your campaigns (engagement, reach, website visits etc), actives and inactives.
The Ad Sets are the "settings" of your campaigns. You will find here the audience, location, ad placement you chose for your campaigns.
The Ads are all your ads that are under your ad sets (and under your campaigns then). You can check and edit all your ads.
To start a campaign, let's click on the campaign tab and click on the green button Create.
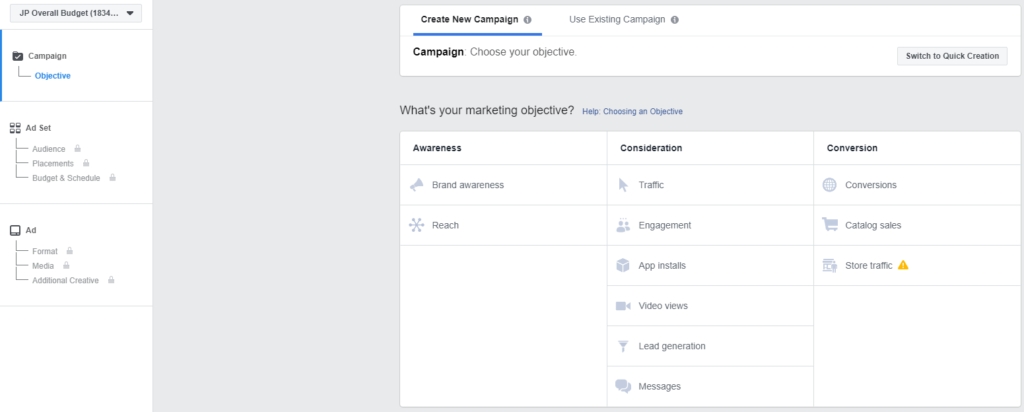
For today's assignment we will click on Engagement within the Consideration list.

Optional: This box appears on top of the selection. If you are creating ads related to credit, employment or housing, you will be required to check the box. For others, just don't care about it!

As you can see, you have 3 options:
- Post Engagement: to increase likes comments and shares on your posts.
- Page Likes: create ads to increase your page likes.
- Event Responses: Create ad for your events.
Regarding your choice, the difference will be seen on ad sets and while creating ads.
But for now, we will go for post engagement. So let's click on the selected option.
Create A/B Test: Allows you to test different ads or ad sets and let Facebook keep the winner and stop the loser one.
Then, if it is not on yet, switch On the Campaign Budget Optimization. It will allow you to manage your campaign budget from one place and for Facebook to optimize your budget between the different ad sets in this campaign.
Campaign Budget: Choose between Daily Budget (spending x amount per day) or Lifetime Budget if you have a fixed budget to spend.
We would suggest you to split your budget into daily smaller budgets and control your results daily/weekly.
Campaign Bid Strategy: you can control how much you bid per auction. We suggest to not touch this and keep it at Lower Cost.
Click the blue button Continue to follow up on ad sets settings.
Setting Ad Sets

It will come as no surprise that this part is similar to the audience setting in the boosting post section so we will not repeat this part.
Take not that the only difference is that you can select the language your ad is targeting. Useful to target Spanish speakers in the US for example.
Let's focus on what is new here.
- Connections: Here you can include/exclude people who had previously engaged with your page/app/event.
- Save this audience: Save your audience settings to use them back in another ad sets through the option Use Saved Audience.

Following is the placements of your ads or basically where your ads will appear on Facebook.
- Automatic Placements: Let Facebook automatically decide where to place your ads.
- Manual Placements: Choose, by yourself, where you want to see your ads around Facebook (and Instagram if available).
Now we will have special settings based on your choice of objective:
Optimization & Spending Controls For Post Engagements

Optimization for ad delivery:

3 options:
- Post Engagement (Recommended): gives you most likes, shares & comments
- Daily Unique Reach: if you want to focus on sending to the biggest number of people. The risk is to have more visibility but less engagement on your ads.
- Impressions: shows your ads as much as possible. Meaning that your ads could be shown multiple times to the same people.
Schedule: Choose to run continuously or fix start and end dates.
Ad Set Spend Limits: you can put a min and a max daily spend limit for your ad set. This is useful if you have multiple ad sets and you want Facebook to spend a minimum on each ad set or to not spend all the campaign daily budget on one ad set over one other.
When you get charged: Impression. The only option here. You pay for ever impression regardless of any action people are doing.
Optimization & Spending Controls For Page Likes
Optimization for ad delivery: Page Likes. Facebook will deliver your ads to the right people to help you get more Page likes at the lowest cost.
When You Get Charged:
- Impression: same as the other objective.
- Page Like: you pay only if there is a page like.
Optimization & Spending Controls For Events
Optimization for ad delivery:
- Post Engagement
- Daily Unique Reach
- Impressions
- Event Response: focuses on people who have the highest probably to join your event.
When You Get Charged: Impression
You just saw all the type of engagement ad sets. Let's see how to create ads!
Creating Ads

The cherry on the cake: ads!
First of all, choose the Facebook page you want to link to this ad. The selection of available pages are based on pages you set on the business settings before.
Refer to the business set up section if you don't remember.
Do you have an Instagram account? Add it as well. Only, of course, if you have ads going to the Instagram feed for example.
If you don't have Instagram accounts but you still want your ads to appear on Instagram, just click on the Use selected Page option.


Now you have 3 main options to create your ads.
Use Existing Post

Here you will have 2 options, to use an existing post (from your selected Facebook Page) or to create a new post that will be published on your Page and will be used as ad.
You can use an existing post by clicking Select Post and choose the post you want to use.

Just click on the post that you want to use but be aware that you can not modify an existing post. If you ant to do add something you will need to update directly the post from your page or to create a new post.
So let's see how to create a new post.
Next to Select Post, click on the + button to create a new post.
You will be able to create a post that will be published on your Facebook Page and will serve as your ad.
Now let's focus on the Create Ad option.
Create Ad

For an engagement post, you can choose between an image, a slideshow of multiple images or a video.
You can also create an Instant Experience by checking the box next to Add an Instant Experience.
It will allow you to create a mobile experience, looking like a catalog.

Try it if you want but for simple engagement it is certainly not the most recommended.
For a normal ad, you need to select an image or a video by clicking Add Media.

By choosing images, you can select images used on your page, on your Instagram account or upload new ones for your or, finally, use stock photos.

By choosing videos, you will be able to upload a video or use an existing one within your page, account or an url.
Create Slideshow

Following option is the Slideshow that let you create a short video with a series of selected pictures. As you can see in the picture, you can select different templates and then click on Continue to add pictures and edit the video:

Now we got all the visual options, let's write!
Text for the Ad

Primary Text: that is where you will write your main ad copy. You can write a short or long text, it is up to you. Yet, try to keep it short and straight to the point as you have an excerpt of around 3 lines. You can check the preview on different displays (smartphone, desktop etc) on the right side.
Headline (Optional): give a great headline to grab attention. Don't forget to check the preview to keep your headline fully displayed.
For Page Likes and Events, you don't have this option.
Event (Only for Events): add the url of your Facebook Event. It implies that you already created your event prior to this ad campaign setup.
Tracking
Conversion Tracking: If you have a Facebook Pixel set up and you are planning to send people to your website (which should not be the case with these 3 objectives), just switch on to your Facebook Pixel and you should be good to go!
App Events: Set up events regarding actions that people can do on your app.
Url Parameters: to add trackers at the end of any link you use in the ad so your analytic software (like Google Analytics) can track correctly where people come from.
When you are good to go, press Confirm and that's it! You did an engagement ad.
That was long but we hope it was detailed enough to do it yourself. If not, don't hesitate to let us work it for you.
CONTACT US NOW!
Let's see how we can help your business

